Quick Air Mattress Repair: DIY Solutions for Patching Holes
How to fix a hole in an air mattress: DIY solutions
Nothing ruin a good night’s sleep like wake up on a deflate air mattress. Whether you’re camp out of doors or host overnight guests, a leaky air mattress can rapidly become a major inconvenience. Luckily, you don’t need to rush out and buy a replacement. With some simple DIY techniques, you can repair your air mattress and restore it to full functionality.
Find the leak: detection methods that work
Before you can fix a hole, you need to find it. Here are several effective methods to locate that elusive leak:
The soapy water method
This classic technique remains one of thewell-nighh reliable ways to find air mattress leaks:
- Inflate your mattress entirely
- Mix a solution of dish soap and water in a spray bottle
- Spray the solution over the mattress surface, focus on seams, valves, and any suspicious areas
- Watch cautiously for bubbles form, which indicate escape air
- Mark the spot with a piece of tape or washable marker
The bubble occur as air escapes through the hole and pass through the soapy solution, create a visual indicator that’s hard to miss.
The listening method
For larger leaks, this straightforward approach oft work:
- Inflate the mattress full
- Move to a quiet room
- Place your ear snug to the mattress surface
- Slow move around the mattress, listen for the faint hiss sound of escape air
- Apply gentle pressure to different areas to help force air through the hole
The submersion test
For smaller mattresses or when other methods fail:
- Inflate the mattress
- Fill a bathtub with water
- Submerge sections of the mattress while watch for bubbles
- Mark the leak location before remove from water
This method work especially wellspring for find pinhole leaks that other techniques might miss.
Common causes of air mattress holes
Understand why your mattress develop a leak can help prevent future damage:
-
Overinflation
exceed the mattress’s capacity put excess pressure on seams -
Sharp objects
pets, jewelry, or debris can puncture the surface -
Weight distribution
concentrated pressure from sit on edges -
Manufacture defects
weak spots from production issues -
Age relate deterioration
material breakdown over time
DIY repair methods use household items
Once you’ve located the leak, you can choose from severalDIYy repair options base on what materials you’ve available:
Bicycle tire patch kit method
A bicycle repair kit offer a purpose make solution that work magnificently for air mattresses:
- Deflate the mattress entirely
- Clean the area around the hole with rub alcohol
- Allow the surface to dry good
- Sand the area gently if the kit includes sandpaper
- Apply the patch adhesive accord to kit instructions
- Press the patch hard over the hole, ensure it extends at least half an inch beyond the damage in all directions
- Place a heavy, flat object on top of the patch
- Allow to cure accord to the kit instructions (typically 6 8 hours )
Hot glue gun method
For a quick emergency fix when camp or when other materials aren’t available:
- Deflate the mattress
- Clean and dry the area around the hole
- Heat up your glue gun to medium temperature
- Apply a small amount of hot glue instantly over the hole
- Allow the glue to cool whole (virtually 10 minutes )
- Apply a second layer for additional strength
- Let the repair cure for astatine least 2 hours before inflate
This method work swell for small punctures and provide a temporary solution until a more permanent repair can be make.
Shower curtain liner or plastic tablecloth method
When commercial patches aren’t available, these household items can save the day:
- Cut a piece from a plastic shower curtain or tablecloth that extend astatine least 1 inch beyond the hole in all directions
- Deflate the mattress
- Clean the area with alcohol and let dry
- Apply a thin layer of strong adhesive like gorilla glue or contact cement to both the mattress and the patch
- Allow the adhesive to become tacky (follow product instructions )
- Press the patch firm onto the mattress
- Place a heavy book on top for pressure
- Allow to cure nightlong
Duct tape method
For genuinely emergency situations or temporary fixes:
- Deflate the mattress partly (enough to remove pressure but keep the surface firm )
- Clean and dry the area good
- Cut a piece of duct tape that extend astatine least 2 inches beyond the hole in all directions
- Apply the tape swimmingly, avoid wrinkles or air bubbles
- For extra durability, apply a second piece of tape in the opposite direction, create a cross pattern
- Press firm to ensure good adhesion
- Allow to set for 30 minutes before reinflate
While not a permanent solution, this can get you through a night or weekend until a better repair can be make.
superglue method
For tiny pinhole leaks:

Source: sleeprex.com
- Deflate the mattress entirely
- Clean the area with alcohol
- Apply a small drop of superglue instantly over the hole
- Allow to dry wholly (astatine least 2 3 hours )
- Apply a second layer for reinforcement
- Let cure nightlong before inflate
Use a commercial patch kit efficaciously
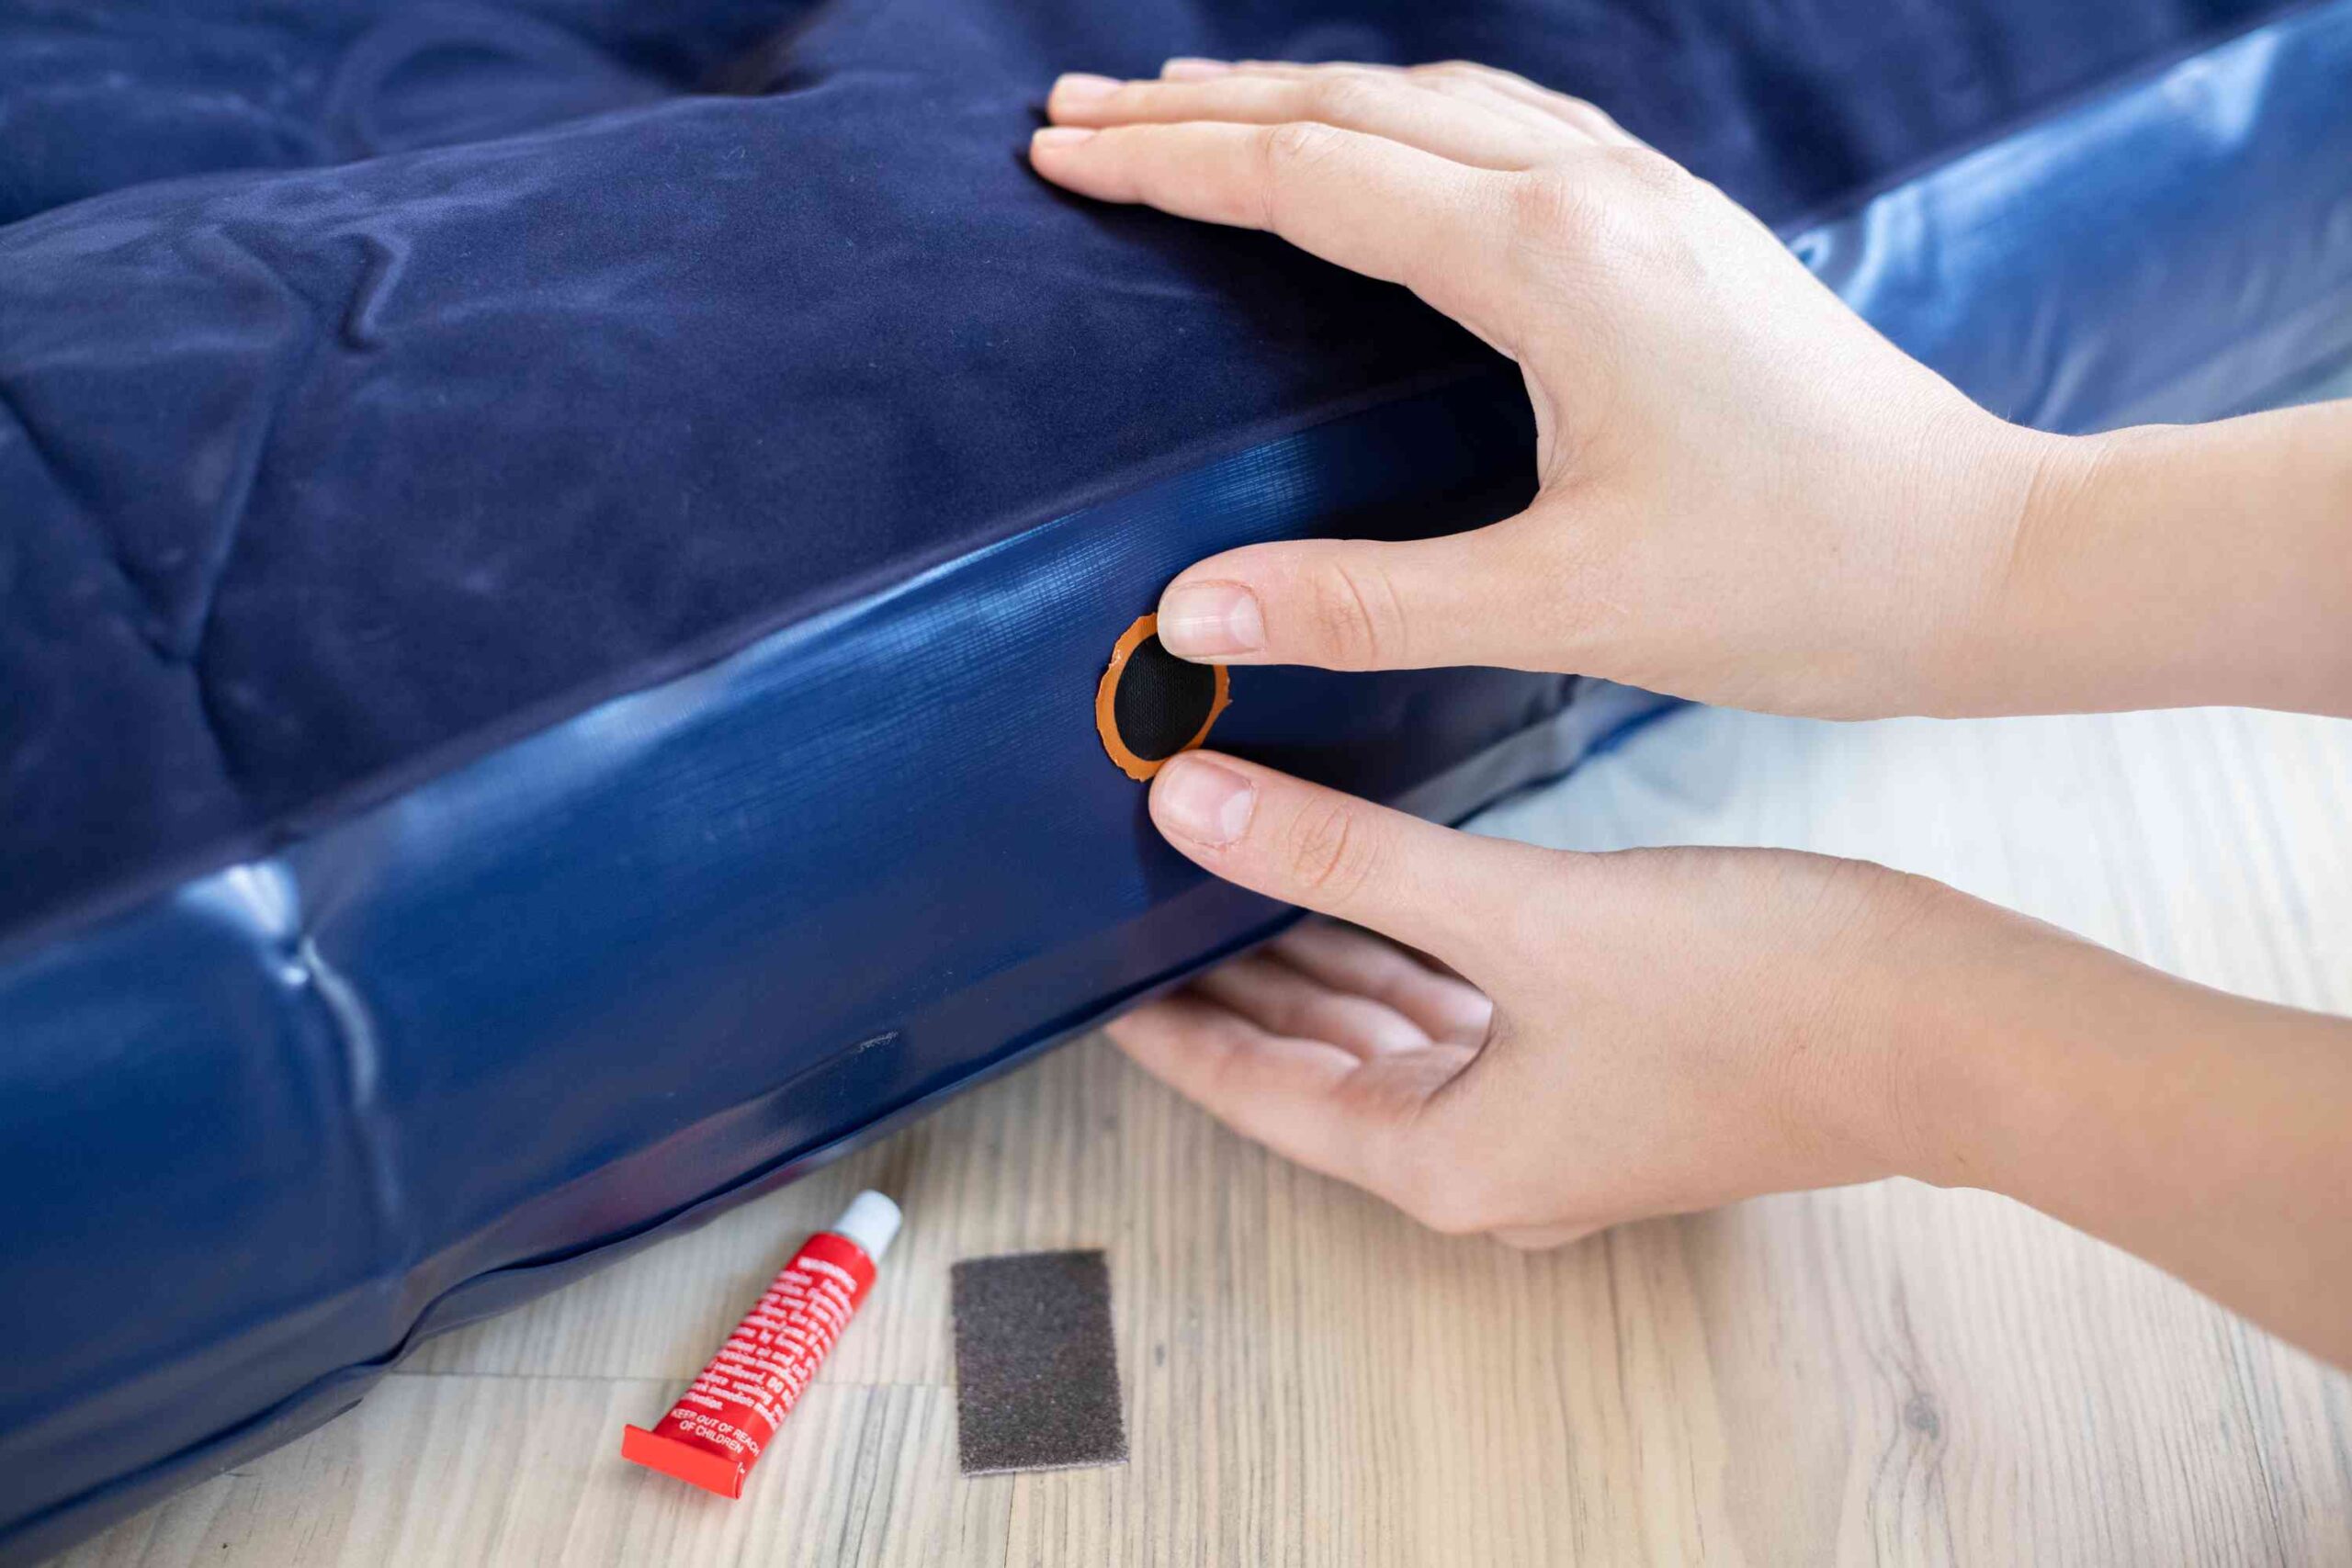
While DIY solutions work comfortably, commercial patch kits design specifically for air mattresses offer the virtually reliable repairs:
Vinyl patch kit application
- Purchase a patch kit design for vinyl or PVC materials
- Deflate the mattress entirely
- Clean the area with to include alcohol prep pad or rub alcohol
- Allow to dry entirely
- Cut the patch to size, ensure it extends at least ½ inch beyond the hole in all directions
- Round the corners of the patch to prevent lifting
- Apply the adhesive equally to both the patch and the mattress
- Wait until the adhesive become tacky (ordinarily 2 3 minutes )
- Press the patch firm onto the mattress, start from the center and work outwards to avoid air bubbles
- Place a heavy, flat object on top of the patch
- Allow to cure for the time specify in the instructions (typically 8 24 hours )
Repair difficult areas
Some leaks occur in challenging locations that require special techniques:
Fix seam leaks
Seams are common failure points but can be repair:

Source: sleeprex.com
- Identify just where along the seam the leak is occurred
- Clean the area good
- Apply a thin line of seam sealer (available at camping stores )instantly to the leak section
- Allow to dry accord to product instructions
- Apply a second coat if necessary
- For add protection, consider apply a patch over the repaired seam
Valve repairs
When the leak is at the valve:
- Check if the valve is plainly loose and can be tightened
- Inspect the valve for cracks or damage
- For internal valve issues, apply a thin layer of silicone sealant around the base of the valve
- For damaged valves, contact the manufacturer for replacement parts
Test your repair
Before declare victory, verify your repair was successful:
- Inflate the mattress full
- Apply the soapy water solution over the repaired area
- Watch for bubbles that would indicate the repair didn’t full seal
- Leave the mattress inflate for several hours to ensure it maintain pressure
- If bubbles appear or the mattress deflates, repeat the repair process with a larger patch or different method
Preventative measures
The best repair is the one you ne’er have to make. Protect your air mattress with these preventative steps:
- Invariably place a ground cloth, tarp, or blanket under your mattress
- Inspect the area for sharp objects before setup
- Keep pets with claws aside from the mattress
- Remove jewelry before lie down
- Avoid sit on the edges, which create pressure points
- Don’t overinflate, specially in hot weather when air expand
- Store decent in a cool, dry place outside from sharp objects
- Follow manufacturer guidelines for inflation and weight limits
When to replace alternatively of repair
While many air mattresses can be repair, sometimes replacement is the better option:
- Multiple leaks across the surface
- Large tears exceed 3 inches
- Internal structural damage cause bubble or uneven inflation
- Repeat repairs to the same area fail
- When the cost of repair materials approach the price of a new mattress
Final thoughts on DIY air mattress repair
With the right techniques and a little patience, most air mattress leaks can be successfully repaired at home. Keep basic repair supplies on hand, particularly if you use air mattresses often or for camping trips. A small investment in repair materials can extend the life of your air mattress importantly, save money and prevent the frustration of unexpected deflation.
Remember that prevention is invariably easier than repair. Proper care and storage will keep your air mattress in good condition and will minimize the need for patches. By follow the methods outline supra, you can rapidly address leaks when they do occur and get cover to enjoy a comfortable night’s sleep.