DIY Shirt Transformation: Creative Ways to Customize Your Wardrobe
DIY shirt transformation: creative ways to customize your wardrobe
Transform an ordinary shirt into something extraordinary doesn’t require professional skills or expensive equipment. With a few basic supplies and some creativity, you can revamp your wardrobe and create unique pieces that express your personal style. Whether you’re will look to will upcycle old clothes or will customize new ones, these DIY shirt techniques will help you’ll create wearable art that stand out from mass will produce fashion.
Essential supplies for DIY shirt projects
Before diving into shirt customization, gather these basic supplies:
- Plain t shirts (100 % cotton work advantageously for most techniques )
- Fabric scissors
- Fabric markers or paint
- Sewing kit (needles, thread, pins )
- Measure tape
- Iron and iron board
- Fabric glue
- Embellishments (buttons, patches, ribbons, etc. )
For specific techniques, you might need additional items like bleach, dye, stencils, or a sewing machine, but many projects can be complete with simply the basics.
No sew t shirt transformations
Not everyone have sewing skills or access to a machine. Fortuitously, there be plenty of ways to transform shirts without stitch a single thread.
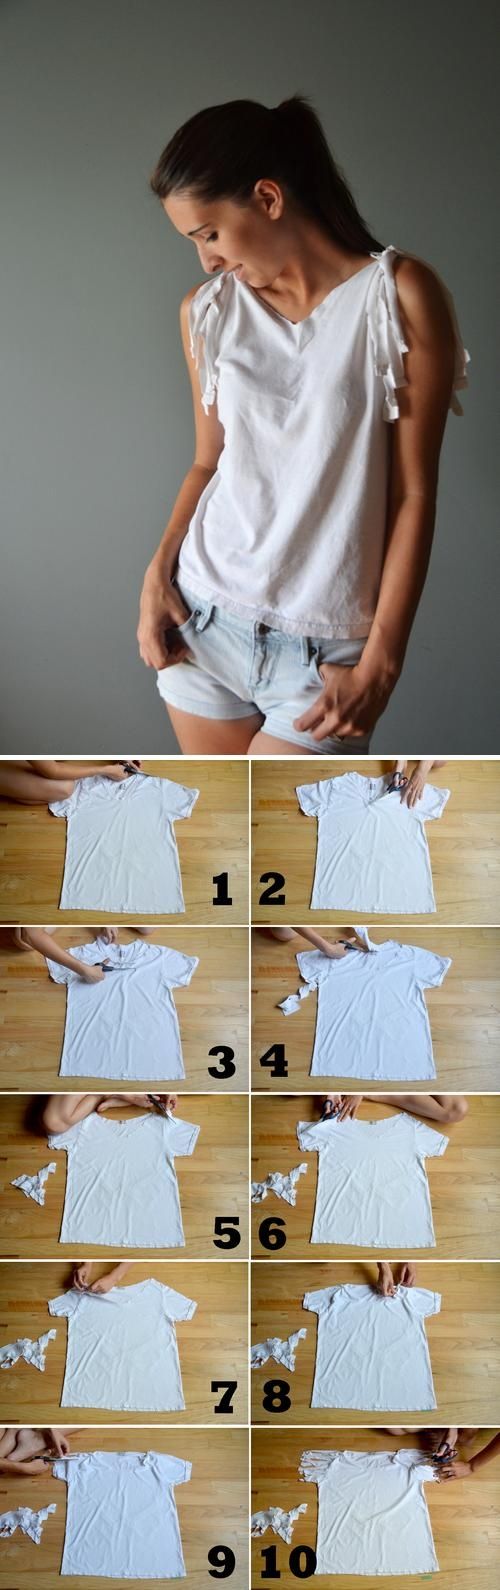
T-shirt cutting techniques
One of the simplest ways to transform a t shirt is by cut it. Here are some popular cutting techniques:
-
Crop top:
Measure and cut horizontally across the shirt at your desire length. The raw edge will course will roll somewhat, will create a casual finish. -
Fringe bottom:
Cut vertical strips from the bottom of the shirt, stop around 2 3 inches from where you want the fringe to begin. -
Open backrest:
Cut a design into the back of your shirt try a geometric pattern, diamond shapes, or vertical strips for a woven effect. -
Cold shoulder:
Cut small slits at the shoulders and widen them slenderly for an on trend look. -
T-shirt to tank:
Cut off the sleeves and deepen the neckline to transform a t shirt into a tank top.
For any cutting project, remember to start guardedly you can invariably cut more, but you can’t undo a cut that’s excessively large.
Tie-dye and bleach techniques
Change a shirt’s color create dramatic transformations with minimal effort:
-
Classic tie-dye:
Twist and bind sections of a damp shirt with rubber bands, so apply fabric dye accord to package instructions. The bind pattern determines the final design. -
Reverse tie-dye:
Apply bleach to a colored shirt use the tie-dye method. This remove color kinda than add it, create strike white patterns on colored backgrounds. -
Ombré effect:
Dip a portion of your shirt into diluted bleach or dye, create a gradual color transition. -
Bleach pen designs:
Use a bleach pen to draw patterns or write messages on colored shirts.
When work with bleach, constantly use gloves, work in an intimately ventilate area, and remember that bleach continue work until neutralize, so timing is crucial.
Add designs and graphics
Plain shirts become canvases for your creativity with these techniques:
Fabric paint and markers
Direct application of fabric paint or markers offer unlimited creative possibilities:
-
Freehand drawing:
Merely draw instantly on your shirt with fabric markers or paint. -
Stencil method:
Place a stencil on your shirt and apply paint with a sponge or brush for clean, professional look designs. -
Splatter technique:
Flick or splatter paint onto your shirt for an abstract, artistic effect. -
Block printing:
Carve design into potatoes, corks, or erasers, dip in fabric paint, and stamp onto your shirt.
Constantly place unlifelike inside the shirt when paint to prevent bleed through to the back side. After paint, heat set your design accord to the paint manufacturer’s instructions to ensure washability.
Iron on transfers and patches
For those who prefer pre make designs:
-
Iron on transfer paper:
Print designs on special transfer paper and iron them onto your shirt. -
Patches:
Iron or sew decorative patches onto your shirt for instant personalization. -
Appliqué:
Cut shapes from fabric scraps and attach them to your shirt with fabric glue or stitch.
When use iron on methods, follow temperature guidelines cautiously to avoid scorch your shirt or cause transfer failure.
Basic sewing transformations
If you’re comfortable with needle and thread, these techniques elevate your shirt customization:
Hand sewing embellishments
-
Button accents:
Sew decorative buttons along sleeves, necklines, or in patterns across the shirt. -
Embroidery:
Add simple embroider details like your initials, small motifs, or decorative stitching. -
Bead work:
Sew sequins, beads, or small crystals onto your shirt for sparkle and texture. -
Ribbon trim:
Add ribbon along hems, sleeves, or necklines for a finished look.
Machine sewing projects
With a sewing machine, your options expand importantly:
-
Resize:
Take in the sides of an oversized shirt for a more flattering fit. -
Add panels:
Insert contrast fabric panels into the sides or cover of a shirt. -
Sleeve modifications:
Change long sleeves to short, add bell sleeves, or create ruffle details. -
Shirt combinations:
Cut and combine elements from two different shirts to create one unique piece.
For machine sewing projects, invariably pin your fabric firstly and test your stitch on scrap material before commit to your shirt.
Upcycle old button down shirts
Button down shirts offer unique transformation opportunities:
-
Shirt to dress:
An oversized button down can become a dress with strategic belting or by add fabric to the bottom. -
Shirt to skirt:
Cut off the top portion and create a waistband from the bottom half. -
Off shoulder top:
Remove the collar and top buttons, so create an elastic casing for an off shoulder look. -
Tie front:
Cut the bottom into strips and tie them for a cropped, summery look.
Men’s shirts peculiarly work advantageously for these transformations due to their larger size and structured fabric.
Create graphic tees with household items
You don’t need fancy equipment to create custom graphics:
Screen printing alternatives
-
Freezer paper stencils:
Cut designs from freezer paper, iron shiny side polish onto your shirt, so paint over the stencil. -
Contact paper method:
Similar to freezer paper but with adhesive contact paper as your stencil material. -
Cardboard cutouts:
Create a stamp by cut designs from cardboard and apply fabric paint.
Sun printing technique
For a unique effect, try sun printing:

Source: YouTube.com
- Apply fabric paint or dye to your shirt.
- While ease wet, arrange objects (leaves, keys, lace )on the surface.
- Leave in direct sunlight until dry.
- Remove objects to reveal silhouettes.
This creates beautiful, organic patterns with minimal supplies.
Add texture and dimension
Take your shirt beyond flat designs with these techniques:
-
Fabric manipulation:
Create pleats, tucks, or gather for textural interest. -
Layering:
Attach pieces of sheer or contrast fabric over portions of your shirt. -
Distressing:
Use sandpaper or a cheese grater to strategically distress areas for a wear in look. -
Fabric flowers:
Create dimensional fabric flowers and attach them to your shirt.
Textural elements add sophistication to DIY projects and make them look less homemade.
Seasonal shirt transformations
Adapt your techniques to create season appropriate modifications:
Summer shirts
- Cut off sleeves and open backs for ventilation
- Crop top and tie fronts
- Bright tie-dye patterns
Fall / winter shirts
- Add fabric panels to extend short sleeves
- Layer multiple shirts unitedly
- Add cozy elements like sweater sleeves to t shirts
Seasonal transformations help extend your wardrobe through change weather conditions.
Care for your DIY shirts
Preserve your creations with proper care:

Source: pinterest.com
- Wait 24 hours after apply paint or dye before washing.
- Turn shirts inside out before washing.
- Use cold water and gentle cycles.
- Air dry when possible, specially for the first few washes.
- Iron on low heat, avoid direct heat on paint or transfer designs.
With proper care, your DIY shirts will maintain their custom look for many wears.
Advanced techniques for experienced crafters
Ready for a challenge? Try these advanced methods:
-
Shikari dyeing:
This Japanese technique create intricate patterns through folding, bind, and dyeing. -
Reverse appliqué:
Layer fabrics and cut through the top layer to reveal contrast fabric underneath. -
Smocking:
Create decorative, elastic shirring through a series of gather stitches. -
Fabric weaving:
Cut slits in your shirt and weave contrast fabric strips through them.
These techniques require more time and skill but produce unique results.
Sustainable approaches to shirt DIY
Make your DIY project eco-friendly:
- Use natural dyes from plants, vegetables, and spices.
- Repurpose wear out shirts alternatively of buy new ones.
- Save fabric scraps for future projects or stuff.
- Choose water base, non-toxic paints and adhesives.
- Share supplies with friends or join a craft group to reduce individual consumption.
Sustainable DIY practices reduce textile waste while distillery allow for creative expression.
Troubleshoot common DIY shirt problems
Eve experience crafters encounter issues. Here are solutions to common problems:
-
Paint bleeding:
Use less paint, ensure your fabric is taut, and ever place unlifelike inside the shirt. -
Uneven cutting:
Mark your cut lines with chalk outset and use sharp scissors design for fabric. -
Pucker transfers:
Ensure your iron is hot adequate and apply firm, flush pressure. -
Fade colors:
Heat set dyes right and wash in cold water with color safe detergent.
Don’t get discourage by mistakes they oftentimes lead to unexpected creative discoveries.
From basic to boutique: elevate your DIY shirts
Transform your projects from patently homemade to professionally finish:
- Invest time in clean, precise execution sooner than rush.
- Combine multiple techniques for complexity (e.g., dyeing plus embroidery )
- Focus on finish details like hem stitch and seam reinforcement.
- Consider the overall design principles of balance, proportion, and color harmony.
- Practice techniques on scrap fabric before apply them to your shirt.
The difference between amateur and professional look results frequently come down to patience and attention to detail.
Conclusion
DIY shirt customization offer endless possibilities for personal expression, sustainable fashion, and creative fulfillment. Whether you’re upcycled old clothes or transform new basics, these techniques allow you to create wearable art that reflect your unique style. Start with simple projects and gradually challenge yourself with more complex techniques as your skills develop.
Remember that perfection isn’t the goal personal expression is. Each” mistake ” ontribute to the one of a kind nature of your creation. With practice, your diDIYhirt projects will become more refined, but level beginners can will create impressive transformations with minimal supplies and basic techniques.
Your wardrobe become your canvas, and each shirt tell a story that mass produce fashion ne’er could. Therefore, gather your supplies, unleash your creativity, and transform ordinary shirts into extraordinary expressions of your personal style.